It's often said that if you're seeing your first total solar eclipse, do not attempt to take pictures of it. You'll be in for a shock at how fast these precious seconds and minutes of totality pass. Even the longest total solar eclipse seems like the briefest moment. It's such an awe-inspiring sight that you really want to make the most of it.
Odds are, however, that you will be tempted to take your own images. After all, there's nothing like having your own photographs. But how can you shoot the total eclipse?
Always take appropriate safety precautions when observing or imaging the Sun. During the partial phase of the eclipse, you must ALWAYS use a safe solar filter. Only during totality is it safe to remove the filter.
Safe solar filters are put onto the front end of your camera lens or telescope. The filters reduce the sunlight intensity by 99.999% and also give 100% UV- and IR-protection.
The filter should be securely mounted so that it won't be blown away by a burst of wind (keep in mind Iceland can be windy!).
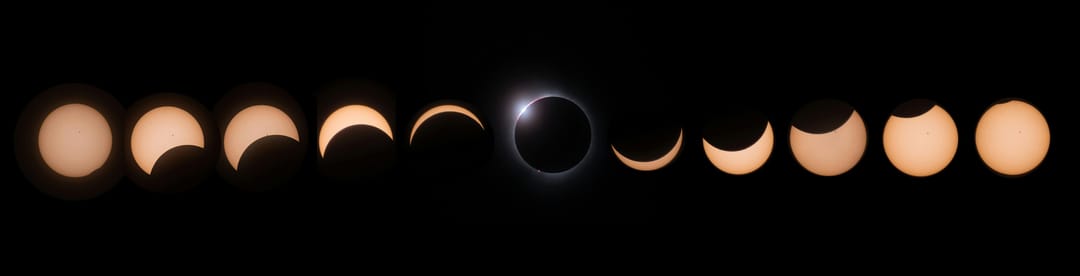
You should still be able to remove the filter quickly before totality and re-attach after. You want to remove the filter when totality starts to catch Baily's Beads, the diamond ring, solar prominences and, of course, the jewel itself: The solar corona.
Our Baader Planetarium safe solar filters for camera lenses and telescopes are perfect for fast attachment and removal. Check them out in our shop.
Shooting the solar eclipse with your smartphone is relatively easy. To shoot the partial phase of the eclipse, you must use a solar filter. Fortunately, if you buy a solar viewer or solar eclipse goggles, you can use those.
If you just point and shoot the partial eclipse, the image of the Sun will be tiny and you run the risk of damaging your phone's cameras. It will also be completely overexposed.
One very useful approach, that will greatly improve your eclipse images, is adapter to attach your phone to a tripod to keep it stable. It also allows you to attain better focus when you zoom in. You can find a phone tripod adapter in our shop.
So how to do it? Just follow these simple steps:
Make sure your phone has enough charge
Place solar eclipse goggles or viewers in front of the camera
If you have a tripod, point it towards the Sun and zoom in. If not, just try and hold it very steady.
Press on the live view image to change the exposure
Focus, lock it and shoot.
To capture totality, do the same as above only without the solar eclipse goggles in front of the camera.
It can also be fun to simply capture a video when the shadow of the Moon approaches and people's reaction when totality starts.
This is done by simply placing your phone on a tripod. A minute or so before totality, simply aim and frame the scene with no filter. Just remember to stop the recording shortly after the end of totality.
A telescope or a telephoto lens is a great option to capture the eclipse in much more detail. A small refracting telescope (60mm to 110mm or so) with up to 800mm focal length is perfect for the job, especially to catch wide field views of the solar corona.
For close-ups of Baily's Beads, the diamond ring, chromosphere prominences a focal length of 1000mm or longer is recommended.
The longer the focal length of the telescope or zoom lens, the faster the Sun drifts through the field of view. That's where a tracking mount comes in very handy.
If you're shooting with a telescope, a tracking mount is a must. A tracking mount ensures that the Sun stays centred on its own, provided you have at least roughly polar aligned the mount. That is easy to do:
Set the mount to your site's latitude (e.g. for Reykjavík, 64°)
Aim the polar axis due north (use the compass app on your phone)
Make sure you don't move the tripod around after you've polar aligned. If you do, then you have to re-align the mount. Also make sure your mount has plenty of power.
We offer a wide variety of tracking mounts for telescopes and cameras in our shop.
Setting the camera is easy.
ISO 100 through the solar filter during partial phase
F-stop from F6.3 to F9 as lenses are generally ssharpest in the middle F-stops, this is also common focal ratio in telescopes
Shoot RAW for easy editing afterwards
Focus
Modern day cameras often feature what's called exposure bracketing. It allows you to shoot a sequence of images that automatically vary the exposures to reveal the extent of the solar corona. By using exposure bracketing, you do not need to fiddle with settings on the camera manually.
Afterwards, you can combine or stack multiple images together in Photoshop and make a beautiful HDR image of the corona.
Odds are you've never seen a total solar eclipse before. It is therefore important to practice with the gear you intend to use.
Figure out how the tracking mount works. Practice shooting the partial phase by shooting the Sun with your safe solar filter.
Article by our friend and colleague, the National Geographic photographer Babak Tafreshi.

